How to Burn Any Video File to a Playable DVD - How-To Geek

Streaming may be the most convenient way to watch most movies, but it doesn't hurt to have a physical copy of your movies or home videos as a fall back. If you want to make a backup copy of your movie collection, or just burn a playable DVD of your own videos, it's pretty easy—and free. Here's how to burn videos to a playable disc on Windows and macOS.
What You'll Need
To burn your own videos to a DVD, you'll need a few things to get started:
- A DVD burner drive: Most computers that come with any kind of optical drive anymore can probably burn DVDs, but if you don't already have one, you'll need to buy a DVD burner. Internal DVD burner drives can cost as little as $20, and external burners are usually only $5-10 more.
- A blank DVD: Blank DVDs are pretty cheap, and are even cheaper per disc in spindles. You'll see two types of blank discs: DVD+R and DVD-R. These two formats are almost identical and almost every drive sold today supports both, so it probably won't matter which one you get. However, if you have an older DVD burner, check to see whether it supports DVD+R or DVD-R. If it only supports one, but not the other, buy the DVDs that are compatible with your drive. Additionally, you can buy what's known as dual layer discs if your movies are really big. Single layer discs can store 4.7GB, and dual-layer discs can store 8.5GB. If you can get away with single layer, we recommend it as dual layer discs can occasionally create problems during the burning process, but both should work. Once again, make sure your DVD drive supports dual layer burning before buying those discs.
- A video to burn: Whether it's your own home movies, or a movie you ripped from your own collection, you'll need a video file (or multiple videos) to burn to your disc. The total size of all the videos you put on the disc must be no higher than 4.7GB (for single layer discs) or 8.5GB (for dual layer discs).
- DVD Flick and ImgBurn (Windows): You'll need two tools to burn your discs on Windows, but fortunately they're both free. DVD Flick converts your videos to the proper format and creates playable menus, then passes the converted video to ImgBurn to burn it to disc. Go ahead and download them now before you get started. (Update: The ImgBurn installer on its official website now appears to include unwanted software. We recommend downloading ImgBurn from MajorGeeks instead. This version does not include the junk. Warning: The ImgBurn download on MajorGeeks now appears to include harmful software, too.)
- Burn (macOS): Burn is another free app for macOS that you can use to burn your DVDs. This can convert your videos to the proper format, create a simple menu, and burn it to disc all in one handy package. Download the app now and then scroll down to the Mac section for instructions on how to use it.
Once you have everything you need, skip to the section for your platform to start burning.
Windows: Burn Video Files to DVD With DVD Flick
The simplest option we've found on Windows is a free app called DVD Flick. This app can convert tons of common video files to a playable video format, and add a basic menu. You can even add multiple tracks to a single disc and pick which one you want to play with your DVD remote. It will then pass that converted video to ImgBurn to burn it to a disc. As long as you have both apps installed, you can start in DVD Flick and ImgBurn will automatically launch when it's needed.
To get stared, open up DVD Flick and click "Add title".

Choose the video file you want to burn to a disc. DVD Flick supports a huge number of video and audio formats and containers. You can see the full list here if you want to make sure your file is compatible.

Before DVD Flick can burn your video to disc, it will need to convert it to the VIDEO_TS and AUDIO_TS folder structure that DVDs use. You'll need up to 8.5GB of space (depending on the size of your video file and the discs you're burning to) on your hard drive to store the converted files. At the bottom right corner of the window, click Browse to choose a place to (temporarily) store the converted video files.

Next, click "Project Settings" to tweak a couple important video settings.

On the General tab, give your disc a title. Next, click the drop down next to "Target size" and choose the size of the disc you're going to burn to.

On the Video tab, make sure that "Target format" is set to NTSC (for playback on DVD players distributed in North America) or PAL (for DVD players in Europe and Asia). You can also adjust the encoding or bitrate options here if you want to tweak your video, but for most users this won't be necessary.

Finally, on the Burning tab, check the box marked "Burn project to disc." You can give your disc a label, which will show up if you insert your DVD into a computer. You can also choose the speed at which you want to burn your DVD. While you can use a faster speed if your drive is capable of it, a speed of 4-6x is recommended, as it reduces the chance that you're going to get a critical error and have to start over. If you want to be extra careful, check "Verify disc after burning." This will run a series of checks to make sure your disc works properly after it's done burning.
When you're done, click Accept.

After this, you can tweak the DVD menu that DVD Flick will add. While this isn't strictly necessary, it's a nice step to customize and give yourself a basic menu like the ones store-bought DVDs have. To change these, click Menu Settings.

On this screen, you'll see a small selection of DVD menus to choose from. They're not the fanciest thing in the world, but the default is no menu at all, which will start playing the videos on your disc immediately. If you'd rather have the option of pressing play—or if you're burning multiple video files to a single disc and want to pick which one to play—choose a menu style you like and click Accept.

Once you're ready, click Create DVD to start the conversion process. A window will appear letting you know the project will be burned to a disc once the conversion is complete. Click Ok. This process will take a little while, so you can take a break, but be sure to keep an eye on your computer, because you'll need to confirm a couple boxes once ImgBurn launches.

After DVD Flick is done converting your video and adding the menus, ImgBurn should open automatically. It will ask you to confirm a couple of options. First, ImgBurn will ask you to confirm your DVD label. If you don't answer this box within 30 seconds, ImgBurn will use the default label.

Next, ImgBurn will show you a summary of what will be burned to the disc and a whole bunch of technical details. There's nothing to decide here, so it's a little annoying ImgBurn doesn't also use a timer for this, but as it is, you still need to click OK to confirm. Just make sure you're around your computer to confirm this little box when it pops up to start the burning step.

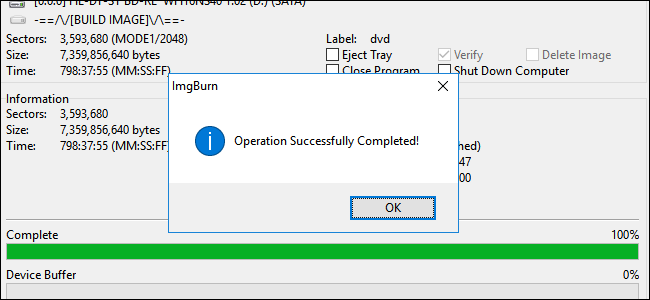
ImgBurn will take a little while to finalize your video, then it will pop up a box that reads "Operation Completed Successfully!" Your DVD drive might also eject the disc when it's done, so make sure the drive is clear of any obstructions.
Pop your disc into any DVD player and you should see the menu you chose on the screen. Click "Play/resume" to start your movie.

DVD Flick creates a very basic menu, but your video should play on any NTSC-compatible (or PAL-compatible, if you chose that) DVD player you have.
Mac: Burn Video Files to DVD with Burn
Burning a video DVD on a Mac is a little more straightforward than on Windows. You only need one application, appropriately named Burn, which you can download here.
Once it's installed, open up the app and click the Video tab along the top.

At the top of the window, give your disc a name and choose "DVD-Video" from the drop down menu on the right.

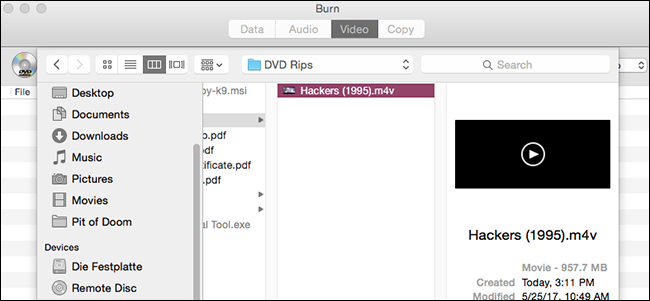
At the bottom of the window, click the plus button to add a video file to your project.

In the window that pops up, choose the movie you want to burn and click Open. Burn is built on several open source conversion tools like ffmpeg, lame, and spumux, so it should handle most common video formats.
Technically, DVDs must be in a VIDEO_TS and AUDIO_TS folder format. Your videos are probably not in this format already, so Burn will offer to convert them for you. Click Convert to start this process. You'll be asked to choose somewhere on your hard drive to (temporarily) store the video files. Make sure you have enough space on your computer and pick a location where you can easily find it later.

Burn will show you a progress bar while it's converting. Grab a snack, this may take a little while. Once it's done, you can burn your video to a disc.

Once the conversion is done, your movie will show up in the list of files to be burned. You can also see how big the file is here, which will clue you into what type of disc you need. Remember, single layer DVDs max out at 4.7GB, but dual layer DVDs can store up to 8.5GB. When you're ready, put a blank disc in the drive and click Burn.

In the window that appears, you can choose which disc drive to burn to and what speed you want to burn it at. While you can customize the speed, it's probably best to go with the recommended settings. Assuming your drive can handle it, you may be able to burn it faster, but this can increase your chances of getting a critical failure, forcing you to restart the entire burning process. Just to be safe, stick with the recommended defaults and click Burn.

Once the burn is finished, pop the disc into any DVD player, and you'll see a super simplified menu. Click on the track you want to watch to play the movie.

As you can see, the menu isn't perfect. Both times I tested it, the highlights over the buttons didn't line up properly, but it's easy enough to figure out how to click Start to play the movie. Otherwise, the movie plays just like any other DVD you'd buy from the store.


Comments
Post a Comment